
This pattern is no longer on-line so I am posting it for my own purpose so I can archive it and make it when ever I want to.
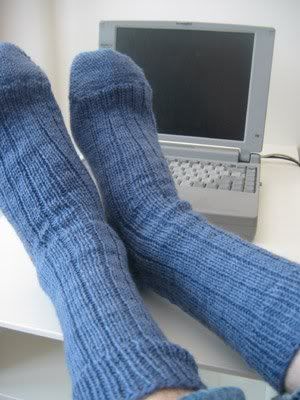
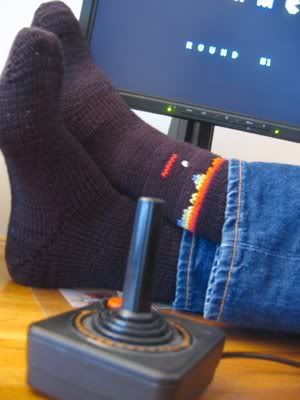
This sock pattern, written for supersoft, superlight, superwash sport weight yarn, is a great basic pattern that can be used to make your tech guy smart looking socks with just a touch of tech. Or, if your guy’s not so geeky, leave out the tech and make regular guy socks. (Heck, knit the small size and make some for yourself!) For techy socks, use one of the charts provided or make your own. In fact, most of the images from old video games or computer screenshots are already pixelated for you. Just draw in the graph lines and you’ve got yourself a chart! For plain socks, I recommend using a manly 3x1 rib down the leg and top of the foot.
Either way, the socks are knit with short-row heels and toes for greater comfort and less bulk. The pattern follows Priscilla Gibson-Roberts’ technique of using backward yarnovers to construct short rows. Don’t worry, doing short rows is just like knitting socks: it may look frighteningly complex, but just follow the directions and it’ll all be okay. If you’d like more information on Gibson-Roberts’ technique, check out her book Simple Socks: Plain and Fancy.
Difficulty Level
Intermediate
Measurements
Women’s or Men’s S, Men’s M, Men’s L
Calf/Foot circumference: 8.5 (9.25, 10) inches
(all socks shown are Men’s M)
Materials needed
[MC]: 2 hanks Lorna’s Laces Shepherd Sport [100 g; 100% superwash wool; 200 yds.] (shown in black #16ns, pewter #9ns, and denim #14ns)
(possible substitutes: Opal Gems Merino, Brown Sheep NatureSpun Sport)
oddments of other colors for embellishment
set of 3.25mm/US4 double-pointed needles, or size required to get gauge
tapestry needle
Gauge
24 stitches and 28 rows = 4" / 10cm square in stockinette stitch
Special Instructions
1x1 rib: *K1, P1*, repeat from *to* for the entire round
3x1 rib: *K3, P1*, repeat from *to* for the entire round
Short-row yarnover: after turning work, hold yarn in WRONG position for working the next row (i.e., behind the work for a purl row and in front of work for a knit row), and work first stitch by bringing yarn over needle.
Short-row K3tog: untwist the next two yarnovers by inserting right needle into each one through the back loop, slipping it to right needle, and then returning it to left needle, then knit the same two yarnovers together with the stitch immediately following them
Short-row P3tog tbl: slip next two yarnovers and the stitch following them to right needle KNITWISE, return them to left needle and purl them together through the back loops

Instructions
Leg:
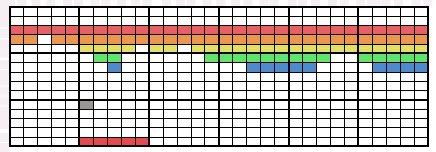
Using the long tail cast on method, cast on 52 (56, 60) stitches. Distribute evenly over four double pointed needles and join to work in the round. Work 12 rounds in 1x1 rib for cuff. Continue leg in desired pattern: 3X1 rib for a plain sock, or stockinette stitch if you are planning to embellish the sock with a design. Note: If your design includes horizontal stripes (like the Breakout socks) you can work the stripes as you knit the leg. Other designs that would require intarsia should be added afterward with duplicate stitch. Continue until leg is 7-8” long or desired length to heel bone.
Heel:
The short-row heel will be worked in stockinette stitch, back and forth, over approximately half the stitches. For each row you will work one less stitch than the row before, turn the work without completing the rest of the row, and make a special yarnover to start the following row (see Special Instructions above) in order to prevent gaps from forming.
Note: If leg was worked in 3x1 rib, redistribute stitches so that the heel is centered as evenly as possible between ribs. This may mean that you won’t be using exactly half the stitches for the heel – that’s okay.
Begin heel: K26 (28, 30) stitches on to one needle, turn, work yarnover (see Special Instructions), purl back across heel stitches, turn and work yarnover again. The first and last stitches of the heel should now have a snug little yarnover attached to them.
Shape the heel by working as follows. On RS, knit up to the first stitch with a yarnover (do NOT work this stitch or its yarnover), turn, and make new yarnover. On WS, purl up to the first stitch with a yarnover (do NOT work this stitch or its yarnover), turn, and make new yarnover. Continue in this manner until only 8 stitches remain in the middle without yarnovers.
Now begin widening the heel again by knitting up to the first stitch with a yarnover, knit that stitch, and then untwist its yarnover by inserting the right needle into the back loop and slipping it over. Slip it back to the left needle and knit it together with the following stitch.* Turn and make new yarnover. Next row: Purl up to the first stitch with a yarnover, purl that stitch, and then slip its yarnover and the following stitch KNITWISE on to the right needle. Slip them back to the left needle and purl them together through the back loop.**
Continue as follows. RS rows: Knit to first stitch with a yarnover, knit that stitch, and in the same manner as at *, K3tog (see also short row K3tog in Special Instructions). Turn and make new yarnover. WS rows: Purl to first stitch with a yarnover, purl that stitch, and in the same manner as at **, P3tog tbl (see also short row P3tog tbl in Special Instructions). Turn and make new yarnover. When you reach the last stitch on each edge of the heel, you will need to work its two yarnovers together with first instep stitch on the next needle. Don’t forget to make a new yarnover when you turn the work! Once you have reincorporated this last heel stitch on the knit and purl side, you should be on the RS and have a single yarnover left at each edge of the heel. ***
Begin working in the round again. Knit the first of the two remaining yarnovers together with the instep stitch following it. Knit around to the stitch before the second yarnover and knit it together with the yarnover. Note: You may find that the stitches at the edge of the heel are a little loose and look like a hole. You can use your knitting needle to tighten up the loose stitch. Pull the extra yarn, one stitch at a time, through every stitch in that row, leaving a little bit of the slack in each following stitch. This redistributes the looseness over the whole row so it is not noticeable. If a pesky hole still remains, you can always weave in some extra yarn on the inside at the edges when you’re done.
Foot:
Redistribute stitches evenly over four needles again and work in the round in desired pattern until foot is approximately 1.5 inches shorter than desired length. Note: If leg was worked in 3x1 rib, continue rib pattern over the instep stitches but knit all stitches across the sole (below the heel). When foot is approximately 1.5 inches shorter than desired length, work one round in stockinette stitch.
Toe:
Be sure that stitches are divided evenly, with exactly half the stitches on two needles for the top of the toe and half the stitches on the other two needles for the bottom of the toe. Redistribute if necessary. Work the toe over the bottom half of stitches (below the heel) exactly as the heel was worked until ***. At this point, all toe stitches have been reincorporated into the toe. Using kitchener stitch, graft the toe stitches to the instep stitches.
Make second sock.
Finishing
Weave in ends. Embroider design on to side of leg using duplicate stitch. Be careful not to pull embroidery or duplicate stitches too tightly, so as not to distort the shape of the sock or make it too snug.
Charts
Breakout:
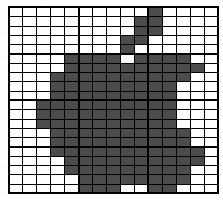
Apple:

No comments:
Post a Comment